Cloudflare WorkersとKV + Wranglerを利用して、Connpassのイベント情報をDiscordに通知するスケジュールbotを作成する
CloudflareコミュニティでConnpassのイベント情報を通知するbotのサンプルを参考に、Wrangler & TypeScriptでプロジェクトを作成し、Connpassのイベント情報を取得し、KVストアに保存し、Discordに通知するアプリケーションを作成する方法を紹介しています。また、KVストアに保存したデータを確認する方法や、DiscordのWebhook URLを安全にデプロイする方法なども解説しています。
目次
コミュニティ用のDiscordがある場合、外部サイトの更新情報(イベント・ドキュメントなど)も通知できると理想的です。
Cloudflareコミュニティの方で、Connpassのイベント情報を通知するbotのサンプルがあったので、これを参考にWrangler & TypeScriptで用意しました。
プロジェクトを作成する
まずはプロジェクトディレクトリを用意しましょう。
% mkdir cloudflare-bots
% cd cloudflare-bots
続いてWranglerでCloudflare Workersのプロジェクトをセットアップします。
% npx wrangler init
 ⛅️ wrangler 2.12.0 (update available 2.13.0)
-------------------------------------------------------
Using npm as package manager.
✨ Created wrangler.toml
✔ Would you like to use git to manage this Worker? … yes
✨ Initialized git repository
✔ No package.json found. Would you like to create one? … yes
✨ Created package.json
✔ Would you like to use TypeScript? … yes
✨ Created tsconfig.json
✔ Would you like to create a Worker at src/index.ts? › Scheduled handler
✨ Created src/index.ts
✔ Would you like us to write your first test with Vitest? … yes
✨ Created src/index.test.ts
次に実行するコマンドのガイドが出ればセットアップ完了です。
✨ Installed @cloudflare/workers-types, typescript, and vitest into devDependencies

To start developing your Worker, run `npm start`
To start testing your Worker, run `npm test`
To publish your Worker to the Internet, run `npm run deploy`
ディレクトリ構造はおおよそこの様な形になります。
drwxr-xr-x   10 okamotohidetaka  staff     320  3 29 18:12 .
drwxr-xr-x   26 okamotohidetaka  staff     832  3 29 18:10 ..
drwxr-xr-x    9 okamotohidetaka  staff     288  3 29 18:11 .git
-rw-r--r--    1 okamotohidetaka  staff    2120  3 29 18:11 .gitignore
drwxr-xr-x  140 okamotohidetaka  staff    4480  3 29 18:12 node_modules
-rw-r--r--    1 okamotohidetaka  staff  167611  3 29 18:12 package-lock.json
-rw-r--r--    1 okamotohidetaka  staff     333  3 29 18:12 package.json
drwxr-xr-x    4 okamotohidetaka  staff     128  3 29 18:11 src
-rw-r--r--    1 okamotohidetaka  staff   10390  3 29 18:11 tsconfig.json
-rw-r--r--    1 okamotohidetaka  staff     117  3 29 18:11 wrangler.toml
Gitで開始地点を記録しておきましょう。これで事故っても戻れます。
% git add .
% git commit -m "init"
次の7ファイルが保存されました。
 7 files changed, 4883 insertions(+)
 create mode 100644 .gitignore
 create mode 100644 package-lock.json
 create mode 100644 package.json
 create mode 100644 src/index.test.ts
 create mode 100644 src/index.ts
 create mode 100644 tsconfig.json
 create mode 100644 wrangler.toml
KVを作成して、プロジェクトに追加する
投稿済みのデータかどうかを判定するためのKey-Valueストアを追加します。
こちらもWranglerでセットアップしましょう。
% npx wrangler kv:namespaces create connpass_events
% npx wrangler kv:namespaces create connpass_events --preview
2つ目のコマンドは、wrangler devでローカル開発する際に利用します。
コマンド実行結果にbindingやidが表示されています。次のような形で、wrangler.tomlへ追加しましょう。
kv_namespaces = [
    { binding = "connpass_events", id = "123456789abcd", preview_id = "abcd123456789" }
]
TypeScriptで使うための型情報を作成する
wrangler typesで、wrangler.tomlを元に型情報を作りましょう。
% npx wrangler types
-------------------------------------------------------
interface Env {
        connpass_events: KVNamespace;
}

✨  Done in 0.77s.
worker-configuration.d.tsファイルが生成されました。
// Generated by Wrangler on Mon Mar 20 2023 20:20:38 GMT+0900 (日本標準時)
interface Env {
    connpass_events: KVNamespace;
}
tsconfig.jsonのcompilerOptions.typesに"./worker-configuration.d.ts"を追加しましょう。
{
    "compilerOptions": {
        "types": [
            "@cloudflare/workers-types",
            "./worker-configuration.d.ts"
        ]
最後に、src/index.tsを確認します。もしEnvがあれば消しましょう。
// [ここから消す]

export interface Env {
    // Example binding to KV. Learn more at https://developers.cloudflare.com/workers/runtime-apis/kv/
    // MY_KV_NAMESPACE: KVNamespace;
    //
    // Example binding to Durable Object. Learn more at https://developers.cloudflare.com/workers/runtime-apis/durable-objects/
    // MY_DURABLE_OBJECT: DurableObjectNamespace;
    //
    // Example binding to R2. Learn more at https://developers.cloudflare.com/workers/runtime-apis/r2/
    // MY_BUCKET: R2Bucket;
    //
    // Example binding to a Service. Learn more at https://developers.cloudflare.com/workers/runtime-apis/service-bindings/
    // MY_SERVICE: Fetcher;
}

// [ここまで消す]
Connpassのイベント情報をAPIから取得する
プロジェクトの準備ができましたので、fetch APIでイベント情報を取得します。
/**
 * Connpassのイベント情報を検索する
 * @param keyword 検索キーワード
 * @returns
 */
export const searchConnpassEvents = async (keyword: string): Promise<string> => {
    try {
        const url = `https://connpass.com/api/v1/event/?order=2&keyword=${keyword}`;
        const response = await fetch(url, {
            headers: {
                'content-type': 'application/json;charset=UTF-8',
                'User-Agent': 'cloudflareworkers',
            }
        })
        const result = await response.text()
        return result
    } catch (e) {
        console.log(e)
        return ''
    }
}

export type ConnpassEvent = {
    event_id: number;
    title: string;
    catch: string;
    description: string;
    event_url: string;
    started_at: string;
    ended_at: string;
    limit: 30;
    hash_tag: string;
    event_type: string;
    accepted: number;
    waiting: number;
    updated_at: string;
    owner_id: number;
    owner_nickname: string;
    owner_display_name: string;
    place: string;
    address: string;
    lat: string;
    lon: string;
    series: {
        id: number;
        title: string;
        url: string
    }
}
export type ConnpassEventAPIResponse = {
    results_start: number;
    results_returned: number;
    results_available: number;
    events: Array<ConnpassEvent>
}

export const parseConnpassEventAPIResponse = (response?: string | null): ConnpassEventAPIResponse | null => {
    if (!response) return null
    return JSON.parse(response)
}
KVへの保存と、Discordへの投稿を行う
取得したイベント情報を元に、KVへの保存やDiscordへの投稿を行うクラスを作りました。
import { ConnpassEvent } from "./connpass";

export class EventNotifier {
    private readonly KV: KVNamespace
    private readonly DISCORD_WEBHOOK_URL: string;
    constructor(KV: KVNamespace, DISCORD_WEBHOOK_URL: string) {
        this.KV = KV
        this.DISCORD_WEBHOOK_URL = DISCORD_WEBHOOK_URL
    }
    public async notifyConnpassEvent(event: ConnpassEvent): Promise<void> {
            const storeItem = await this.KV.get(event.event_id.toString())
            if (storeItem) return
            const result = await fetch(this.DISCORD_WEBHOOK_URL, {
                method: "POST",
                headers: {
                    "Content-Type": "application/json"
                },
                body: JSON.stringify({
                    content: [
                        `**${event.title}**`,
                        event.catch,
                        event.event_url,
                    ].filter(Boolean)
                    .join('\n')
                })
            })
            // Discord通知に失敗したものは保存しない
            if (result.ok) {
                await this.KV.put(event.event_id.toString(), event.event_url)
            }
    }
    public async notifyConnpassEvents(events: ConnpassEvent[]): Promise<void> {
        for await (const event of events) {
            await this.notifyConnpassEvent(event)
        }
    }

}
作成した関数とクラスを組み合わせることで、Connpassからのデータ取得とKVへの保存・Discordへの通知ができます。
Appendix: KVに保存したデータをWranglerから見る方法
wrangler kv:keyコマンドでデータを見ることができます。
% npx wrangler kv:key list --namespace-id 123456789
[
  {
    "name": "269781"
  },
...
特定のキーについてみたい場合は、getを使いましょう。
npx wrangler kv:key get 1234 --namespace-id 123456
https://demo.connpass.com/event/1234/
DiscordのWebhook URLを安全にデプロイする方法
DiscordのWebhook URLを生成すると、外部からDiscordサーバーに投稿ができます。
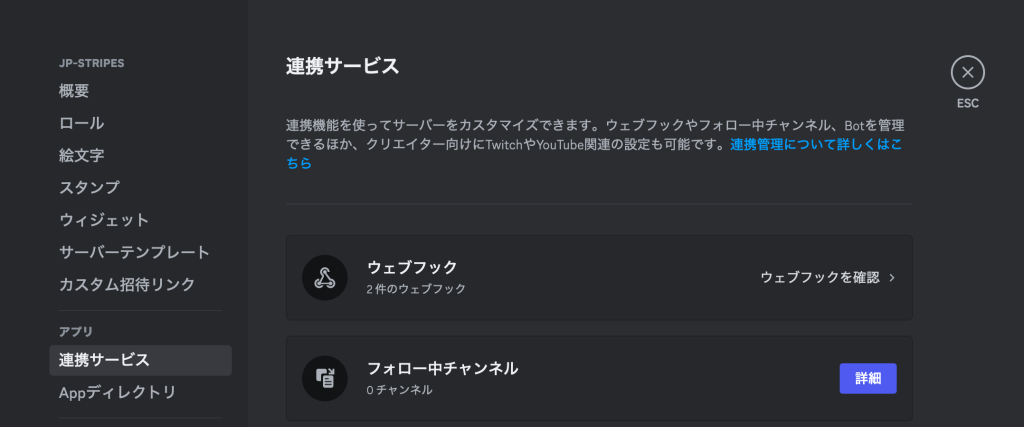
「連携サービス」から「ウェブフック」を選びましょう。

「新しいウェブフック」でURLを取得します。

取得したURLは、wrangler secret put KEYNAMEでCloudflare上にアップできます。
% npx wrangler secret put DISCORD_WEBHOOK_URL
 ⛅️ wrangler 2.12.0 (update available 2.13.0)
-------------------------------------------------------
? Enter a secret value: ›
複数のデータを送ることも可能です。
% npx wrangler secret put SEARCH_KEYWORD
 ⛅️ wrangler 2.12.0 (update available 2.13.0)
-------------------------------------------------------
✔ Enter a secret value: … ******開発環境では、.dev.varsに保存する
wrangler secretコマンドでアップしたキーは、wrangler devで利用できません。
利用したい場合は.dev.varsに保存しましょう。
DISCORD_WEBHOOK_URL=
SEARCH_KEYWORD=
wrangler initで生成した場合は、デフォルトで.gitignoreに追加されています。そうでない場合は追加しましょう。
またTypeScriptを使うケースでは、Envの型に環境変数のキーを追加しましょう。
interface Env {
    connpass_events: KVNamespace;
    DISCORD_WEBHOOK_URL: string
    SEARCH_KEYWORD: string
}
あとはfetchやscheduledの第二引数envから環境変数を利用して使います。
import { parseConnpassEventAPIResponse, searchConnpassEvents } from "./libs/connpass";
import { EventNotifier } from "./libs/EventNotifier.class";

export default {
    async fetch(
        request: Request,
        env: Env,
        ctx: ExecutionContext
    ): Promise<Response> {
        const {
            SEARCH_KEYWORD,
            DISCORD_WEBHOOK_URL,
            connpass_events: KV,
        } = env

        const item = await searchConnpassEvents(SEARCH_KEYWORD)
        const response = parseConnpassEventAPIResponse(item)
        if (!response) {
            return new Response("No items")
        }
        const notifier = new EventNotifier(KV, DISCORD_WEBHOOK_URL)
        await notifier.notifyConnpassEvents(response.events)
        return new Response("Done")
    },
    async scheduled(
        controller: ScheduledController,
        env: Env,
        ctx: ExecutionContext
    ): Promise<void> {
        const {
            SEARCH_KEYWORD,
            DISCORD_WEBHOOK_URL,
            connpass_events: KV,
        } = env
        const item = await searchConnpassEvents(SEARCH_KEYWORD)
        const response = parseConnpassEventAPIResponse(item)
        if (!response) {
            return
        }
        const notifier = new EventNotifier(KV, DISCORD_WEBHOOK_URL)
        await notifier.notifyConnpassEvents(response.events)
    },
};
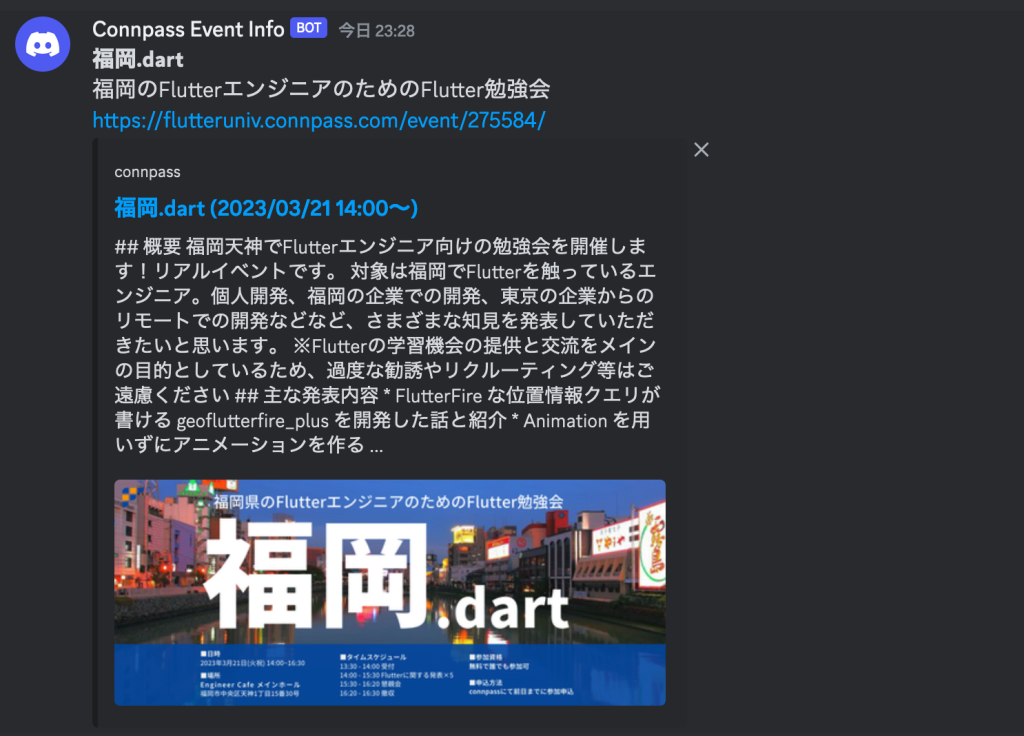
うまく動作すると、この様にポストされます。
