LangChain.jsでChatの履歴をMomentoに保存させてみた
Chat形式のUIを提供する際には、過去の会話履歴を保存する必要があります。この記事では、MomentoのCacheに保存する方法を紹介しています。MomentoのSDKを使用するためには、MomentoのAPIを呼び出すためにSDKをインストールする必要があります。また、Cloudflare Workersなどの一部のエッジサービスでは、Web SDKをインストールする必要があります。具体的なコードのセットアップ方法も述べられています。コードの実行例や関連記事へのリンクもあります。
目次
Chat形式のUIをユーザーに提供する場合、過去の会話履歴をどこかに保存する必要があります。今回はMomentoのCacheに保存する方法をまとめました。
MomentoのSDKをインストールする
LangChainからMomentoのAPIを呼び出すのにSDKが必要です。npmからインストールしましょう。
npm i @gomomento/sdkCloudflare WorkersではWeb SDK
Cloudflare Workersなど、一部のエッジ系サービスではWeb SDK側をインストールする必要があります。
npm i @gomomento/sdk-web xhr4swHonoでアプリを作ってみる
今回もHonoを使ってAPIを作ってみます。まずは環境変数を.dev.varsに保存しましょう。
OPENAI_API_KEY=sk-lxxx
MOMENT_API_KEY=xxxxxx
続いてHonoのアプリをセットアップします。この際、Cloudflare Workersを使う時は、MomentoのSDKがMomento APIを呼び出す際のポリフィルを追加しましょう。
import XMLHttpRequestPolyfill from "xhr4sw";
/**
 * This is needed to polyfill as otherwise we get HttpRequest not defined
 */
Object.defineProperty(self, 'XMLHttpRequest', {
    configurable: false,
    enumerable: true,
    writable: false,
    value: XMLHttpRequestPolyfill
});


export const memoryApp = new Hono<{
    Bindings: {
        OPENAI_API_KEY: string;
        MOMENT_API_KEY: string;
    }
}>()
Momentoのキャッシュクライアントを作成し、その後BufferMemoryとMomentoChatMessageHistoryにクライアントを渡しましょう。
    const cacheClient = new CacheClient({
        configuration: Configurations.Laptop.v1(),
        credentialProvider: CredentialProvider.fromString({
            apiKey: c.env.MOMENT_API_KEY,
        }),
        defaultTtlSeconds: 60,
    });
    // Create a unique session ID
    const sessionId = new Date().toISOString();
    const cacheName = "langchain";

    const memory = new BufferMemory({
        chatHistory: await MomentoChatMessageHistory.fromProps({
            client: cacheClient,
            cacheName,
            sessionId,
            sessionTtl: 300,
        }),
    });
    console.log(
    `cacheName=${cacheName} and sessionId=${sessionId} . This will be used to store the chat history. You can inspect the values at your Momento console at https://console.gomomento.com.`
    );
その後は会話を行うためのChainを、OpenAIなどのモデルを使って用意します。
    const model = new ChatOpenAI({
        modelName: "gpt-3.5-turbo",
        temperature: 0,
        openAIApiKey: c.env.OPENAI_API_KEY
    });

    const chain = new ConversationChain({ llm: model, memory });

    const res1 = await chain.call({ input: "Hi! I'm Jim." });
    console.log({ res1 });

    const res2 = await chain.call({ input: "What did I just say my name was?" });
    console.log({ res2 });

    return c.json({
        res1,
        res2
    })
Hono on Cloudflare Workersでのサンプルコード
ここまでのコードをまとめたのがこちらです。xhr4swまわりはNode.js環境やAWS Lambdaなどでは不要・・・のはずです。
import { Hono } from "hono";
import {
    CacheClient,
    Configurations,
    CredentialProvider,
  } from "@gomomento/sdk-web"; // `from "gomomento/sdk-web";` for browser/edge
  import { BufferMemory } from "langchain/memory";
  import { ChatOpenAI } from "langchain/chat_models/openai";
  import { ConversationChain } from "langchain/chains";
  import { MomentoChatMessageHistory } from "langchain/stores/message/momento";

import XMLHttpRequestPolyfill from "xhr4sw";
/**
 * This is needed to polyfill as otherwise we get HttpRequest not defined
 */
Object.defineProperty(self, 'XMLHttpRequest', {
    configurable: false,
    enumerable: true,
    writable: false,
    value: XMLHttpRequestPolyfill
});


export const memoryApp = new Hono<{
    Bindings: {
        OPENAI_API_KEY: string;
        MOMENT_API_KEY: string;
    }
}>()

memoryApp.get('test', async c => {
    const cacheClient = new CacheClient({
        configuration: Configurations.Laptop.v1(),
        credentialProvider: CredentialProvider.fromString({
            apiKey: c.env.MOMENT_API_KEY,
        }),
        defaultTtlSeconds: 60,
    });
    // Create a unique session ID
    const sessionId = new Date().toISOString();
    const cacheName = "langchain";

    const memory = new BufferMemory({
        chatHistory: await MomentoChatMessageHistory.fromProps({
            client: cacheClient,
            cacheName,
            sessionId,
            sessionTtl: 300,
        }),
    });
    console.log(
    `cacheName=${cacheName} and sessionId=${sessionId} . This will be used to store the chat history. You can inspect the values at your Momento console at https://console.gomomento.com.`
    );

    const model = new ChatOpenAI({
        modelName: "gpt-3.5-turbo",
        temperature: 0,
        openAIApiKey: c.env.OPENAI_API_KEY
    });

    const chain = new ConversationChain({ llm: model, memory });

    const res1 = await chain.call({ input: "Hi! I'm Jim." });
    console.log({ res1 });

    const res2 = await chain.call({ input: "What did I just say my name was?" });
    console.log({ res2 });

    return c.json({
        res1,
        res2
    })
})
動かしてみる
用意ができたので実行しましょう。res2の返答にres1の値が含まれているので、コンテキストを引き継げていることが伺えます。
% curl http://127.0.0.1:8787/memory/test | jq .
  % Total    % Received % Xferd  Average Speed   Time    Time     Time  Current
                                 Dload  Upload   Total   Spent    Left  Speed
100   144  100   144    0     0     35      0  0:00:04  0:00:04 --:--:--    35
{
  "res1": {
    "response": "Hello Jim! It's nice to meet you. How can I assist you today?"
  },
  "res2": {
    "response": "You just said that your name is Jim."
  }
}
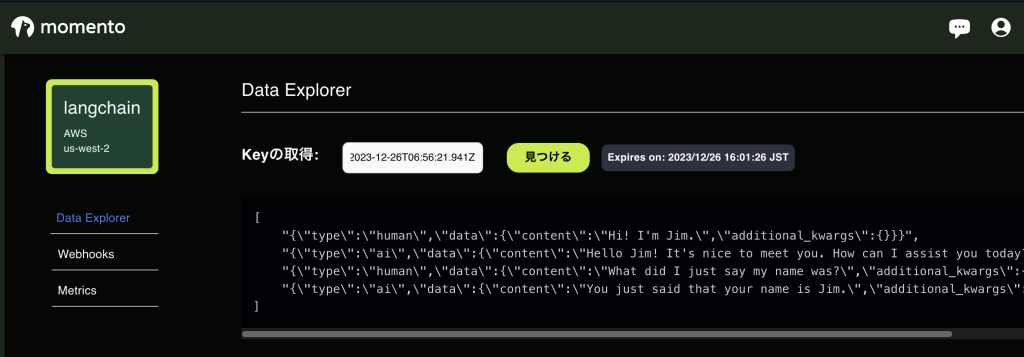
タイムスタンプがキャッシュキーですので、サーバーのログからキーを見つけましょう。キーさえあれば、MomentoのData Explorerで保存内容が見れます。

使ってみた感想
DynamoDBを試した時に感じた、「履歴をいつまで保持するのか」問題の対応案としてMomentoを使うのは一つかもしれません。とはいえこちらはこちらで1日でデータが消えるため、1週間程度保持したい場合などには、使い方を考える必要がありそうです。
あとは・・・Cloudflare Workersを使う場合、Workers KVが使えるといいなという気はします。ただ、LangChain.jsには2023/12時点でまだKVに対応していない様子なので、大人しく待機・もしくはプルリクエストを出してみることになりそうです。
余談
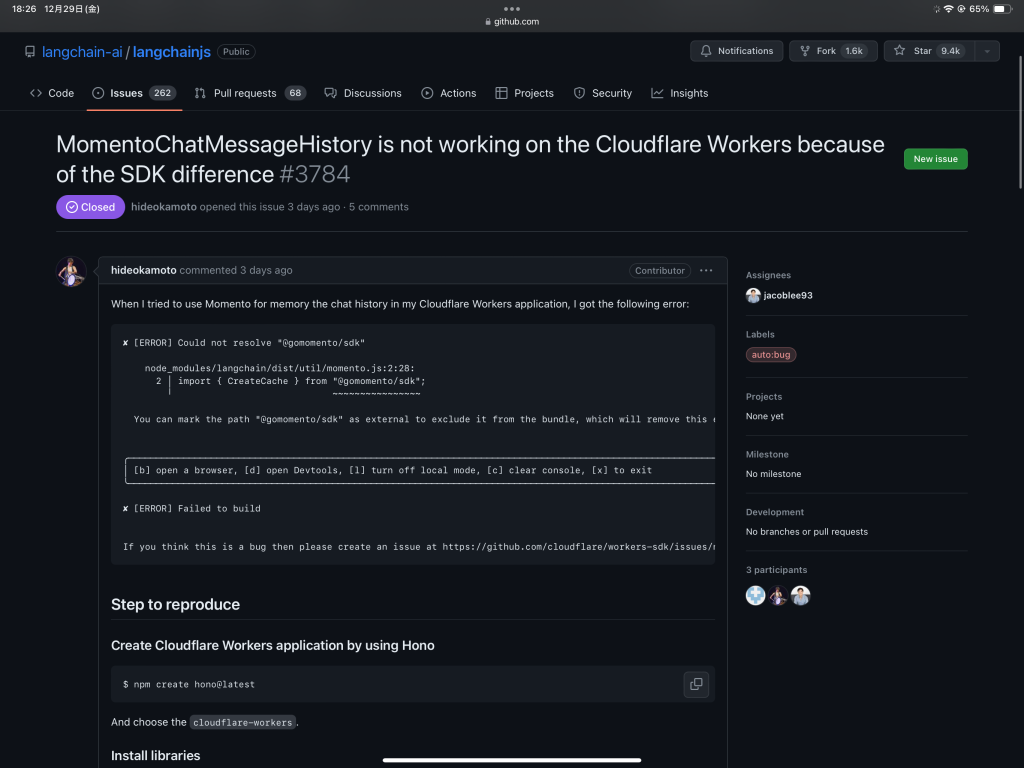
MomentoChatMessageHistoryがCloudflare Workersで動かない問題があったのですが、Issue / Pull Requestを出したところ、無事解決した様子です。もしこれを見ながら試してエラーが出た場合、LangChain.jsのバージョンをアップグレードしてみましょう。

参考にした記事
https://js.langchain.com/docs/integrations/chat_memory/momento